
Wednesday, May 12, 2010
Please?
Another LO from Gatlinburg. I used the DCWV Green stack again with this LO. Mickey Mouse Font was used for the title and Storybook was used for the butterfly. The journaling box edge is a Martha Stewart edge punch.

Wonderworks
This LO sat on my desk for a few weeks while I finished up making baby books, mom's day gifts, and teacher gifts. I used the DCWV Blossoms and Butterflies stack for the patterned paper. Title is made with the Mickey Mouse Font and flowers are Primas.


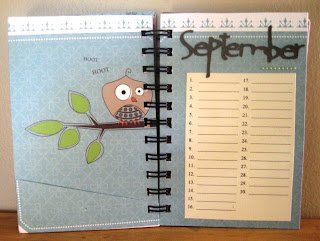
Mother's Day
So I didn't do a traditional mom's day gift this year. I had been trying to decide how I wanted to make one of these birthday reminder books since I heard my mom mention she needed something like this months ago. This is what I came up with (not all pages shown). I used the Green Stack by DCWV (which I love!) and Lyrical Letters for the fonts. The owl on the front cover came from Storybook. All cuts were designed in design studio before cutting.


Teacher Appreciation
So I put it off and put it off. I had another idea that fell through (because I bought the wrong materials), so here is what I threw together at the last minute for Cloe's teacher for teacher appreciation! The sign says "It's Teacher Appreciation Week! Why not milk it?" That was computer generated and glued onto a sign from the Storybook Cartridge. The cow is from Paper Dolls. You can't tell, but I also etched the teacher's name on the jar and added a butterfly at the request of Cloe.


Thursday, May 6, 2010
Coming Soon!
So I haven't had much time to craft recently. We had some serious flooding here in Middle Tennessee and it has been a bit hectic around here. We were lucky and did not suffer much damage, thankfully!!
Anyway, I got in my craft room today and got a last minute teacher's appreciation gift made and I have been working on another project that I can't post just yet. So, be on the lookout in the next few days for a few new projects!
Anyway, I got in my craft room today and got a last minute teacher's appreciation gift made and I have been working on another project that I can't post just yet. So, be on the lookout in the next few days for a few new projects!
Sunday, April 25, 2010
Jungle Card
Here are the cards I made to give with the Jungle flip books. Very simple, but I like how they came out. I used the card feature on Zooballoo and a studio g stamp.


Baby Flip Book Tutorial
What you need for the base of the book:
- Cover: 6.5” x 12” piece of cardstock - Score at 1.5”, 1.75”, 8.25”, and 8.5”
- Cover extenders: 2” x 6.5” cardstock (x2) - Score in the middle (lengthwise to make a 1” x 6.5” piece) - These will be added to each end of your cover to make your cover completely close. Without them you would have a 2” gap in the front of your book.
- Page Bases: 6” x 12” (x2) and 5.75” x 12” (x2) -Score at 4.5” and 10.5”
- Closure: 4 eyelets and coordinating ribbon (about 20”)

When laying out the pages, be sure to leave a little wiggle room at the edges so the pages have enough space to close correctly when all the layers are in there. Once your pages are laid out in the correct positions, glue them down and cover with a piece of cardstock.
To make the album closure, use eyelets to make 4 holes (two on each cover extender). You will weave your ribbon through the eyelets as shown in the image below (don’t you just love my pretty drawings??? Hehe) from the side view, you can see that you need to go all the way around the book. Make sure you leave enough at the end to tie in a bow.

That’s it! Now all you need to do is embellish. Add photo mats and journaling tags and it’s done!
Now, if you want to make the boxes, here is another pretty picture to show how I like to make mine. You may need to click the picture to enlarge to read the notes. Also, please excuse the extra line in there, it looks as though my son was trying to help me!

First I make a square in the middle of a 12 x 12 paper. This should be the size of the box you want. For my books, I made this 6.75” square. Once you have your square, you will need to mark lines to make the sides of the box. I made mine 0.75” sides. You will need to mark two of those lines, going out from your original box. After doing this on all 4 sides, score all these lines. You will need to make 4 cuts as shown in the picture. These cuts will make tabs which will connect the sides together. Fold on all the lines, starting with the sides with the tabs. The other two sides will fold up and over the tabs locking the sides in place. All the triangles will meet in the middle. I like to glue these down just to make sure it doesn’t come undone. You will repeat this for the other part of the box, making sure that when making the top you add about 1/8” all around when drawing your first square. This will help it fit over the bottom.
I hope these are helpful and not too confusing. I should have taken pictures while making these last 2 books, but I did not think of it.
Happy Scrapping!!
Subscribe to:
Comments (Atom)